
Easter Dirt Cups
Easter is a time for celebration, family gatherings, and delicious treats. And what better way to indulge in some sweet treats than by making Easter Dirt Cups? These delightful desserts are not only a feast for the eyes but are also a hit with both kids and adults alike.

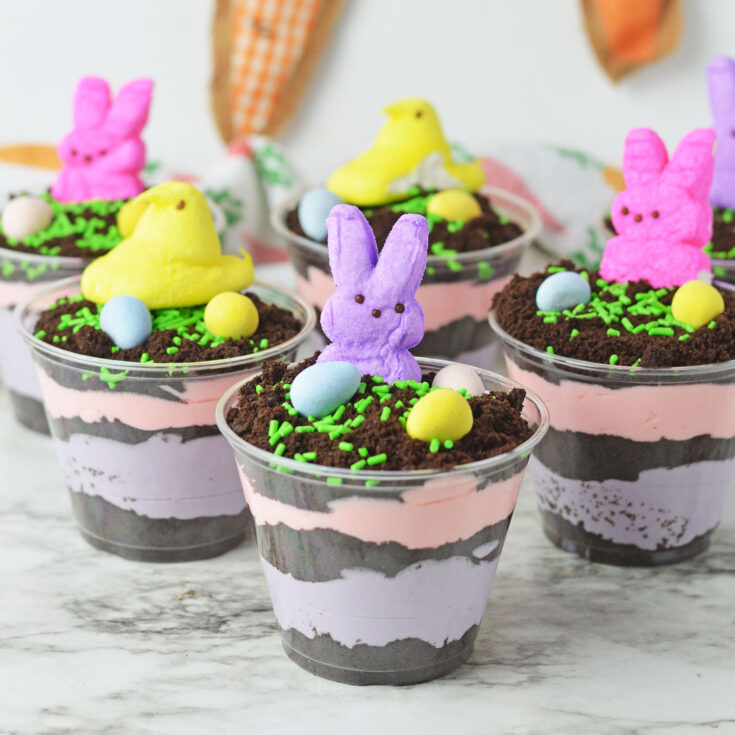
Easter Dirt Cups are an adorable and easy-to-make Easter-themed dessert that resembles a pot of dirt with a surprise hidden inside. The traditional recipe calls for layers of chocolate pudding, crushed Oreo cookies to mimic the soil, and colorful candy eggs to represent the hidden treasures. We opted to do our pudding in fun Easter pastel colors.
Whether you’re hosting an Easter gathering or simply want to enjoy a fun and festive treat at home, Easter Dirt Cups are the perfect addition to your dessert table. So grab your ingredients and get ready to have some tasty fun this Easter!

What are Easter Dirt Cups?
Easter Dirt Cups are a fun and festive dessert typically made with layers of pudding, crushed Oreo crumbs, and topped with Easter-themed decorations such as peeps, chocolate eggs, or bunny-shaped candies.
For a larger dirt cake, check out our fun and festive Easter Dirt Cake recipe.
Ingredients
- Vanilla Instant Pudding
- Milk
- Cool Whip
- Oreos
- Green sprinkles
- Peeps marshmallows
- Mini Egg Candies
- Pink & Green gel coloring

For a detailed list of instructions and directions, see our printable recipe card below!
How To Make Easter Dirt Cups
Step 1: In a large mixing bowl, whisk together vanilla pudding mix and 3 cups milk, until the mixture begins to thicken.
Step 2: Fold in cool whip, stirring until well combined.
Step 3: Use your food processor to crush the oreos (I had to do mine in two batches), or add them to a large ziploc bag to crush by hand.
Step 4: Divide crushed oreos into 3 separate bowls, set aside.
Step 5: Take one bowl of crushed oreos and divide them evenly among your plastic cups to make the bottom layer.
Step 6: Divide your prepared vanilla pudding mixture- ⅓ of the mix in one bowl, and ⅔ the mix in another.
Step 7: To the smaller bowl, add 4-5 drops of purple gel food coloring. You can add more, if needed, to reach your desired shade of purple.
Step 8: Divide the purple pudding evenly among your cups, filling them about ⅓ full.
Step 9: Take the second bowl of crushed oreos, and divide evenly among the 6 cups, making the 2nd layer of oreos on top of the purple pudding mixture.
Step 10: Take your remaining bowl of pudding, and add 4-5 drops of pink gel food coloring. Add more, if needed, until the pudding is pink.
Step 11: Divide the pink pudding mixture among your cups, leaving just a small amount of space at the top for a final oreo layer. Discard any excess pink pudding.
Step 12: Divide the final bowl of crushed oreos between your 6 cups.
Step 13: Sprinkle each cup with green sprinkles, and add a peeps marshmallow and 2-3 mini egg candies.
Easter Dirt Cake Cups Variations
Pudding– you can use any pudding flavor you love for this recipe. If you want the bright colored pudding, you can use vanilla, cheesecake, or white chocolate pudding mix.
Cookie Crumbs– you can swap for other Oreo flavors, as well. Golden oreos would be delicious in this recipe.
Candies– feel free to use any Easter candies you love to decorate these fun cups!

Can you make Easter Dirt Cups ahead of time?
Yes, you can definitely make Easter Dirt Cups ahead of time. In fact, it’s recommended to prepare them ahead to allow enough time for the pudding to set and the flavors to meld together. This make-ahead feature not only makes it convenient for busy Easter parties or gatherings, but also allows the dessert to have the perfect consistency and taste when it’s time to serve. You can assemble the Dirt Cups in individual cups or a large serving dish and then cover and refrigerate them until you’re ready to enjoy. This also allows for easy cleanup and minimal hassle on the day of your Easter festivities. However, it’s important to note that if you are using any perishable toppings like whipped cream or candies, those should be added just before serving to maintain their freshness and texture.
Does the cream filling need to be removed from the oreo?
It’s totally up to you. While you don’t have to remove the cream, I do think it makes for more of a sand/dirt texture if you crush up just the cookies.
How long can pudding dirt cups be stored?
You can cover these cups and store them in the refrigerator for up to 2-3 days!
We hope you love these fun Easter dirt pudding cups. We are obsessed with using peeps Easter candies in fun treats for the Easter season, and these adorable Easter dirt cup desserts are just perfect. Kids love making dirt cups, too, so this is a great way to get them involved in the kitchen.

More Easy Easter Desserts
Easter Dirt Cups
Made with layers of pudding, crushed chocolate cookies resembling dirt, and topped with colorful candy eggs and bunnies, these Easter Dirt Cups are not only delicious but also whimsically themed for Easter.
Ingredients
- 1 (6 oz.) package of vanilla instant pudding
- 3 cups cold milk
- 8 ounces cool whip
- 36 oreos (filling removed)
- Green sprinkles
- Peeps marshmallows
- Mini egg candies
- Pink and green gel food coloring
Instructions
- In a large mixing bowl, whisk together vanilla pudding mix and 3 cups milk, until the mixture begins to thicken.
- Fold in cool whip, stirring until well combined.
- Use your food processor to crush the oreos (I had to do mine in two batches), or add them to a large ziploc bag to crush by hand.
- Divide crushed oreos into 3 separate bowls, set aside.
- Take one bowl of crushed oreos and divide them evenly among your plastic cups to make the bottom layer.
- Divide your prepared vanilla pudding mixture- ⅓ of the mix in one bowl, and ⅔ the mix in another.
- To the smaller bowl, add 4-5 drops of purple gel food coloring. You can add more, if needed, to reach your desired shade of purple.
- Divide the purple pudding evenly among your cups, filling them about ⅓ full.
- Take the second bowl of crushed oreos, and divide evenly among the 6 cups, making the 2nd layer of oreos on top of the purple pudding mixture.
- Take your remaining bowl of pudding, and add 4-5 drops of pink gel food coloring. Add more, if needed, until the pudding is pink.
- Divide the pink pudding mixture among your cups, leaving just a small amount of space at the top for a final oreo layer. Discard any excess pink pudding.
- Divide the final bowl of crushed oreos between your 6 cups.
- Sprinkle each cup with green sprinkles, and add a peeps marshmallow and 2-3 mini egg candies.
Nutrition Information:
Yield:
6Serving Size:
1 cupAmount Per Serving: Calories: 410
Nutrition information isn’t always accurate.