
How to Make a Charcuterie Board


Charcuterie boards are so much fun to create for parties and events. Whether you want something super special for a big event, or just a simple charcuterie board for game day, or a holiday celebration with family, they are the perfect appetizer or snack to have prepared for guests. Today I’m sharing how to make a charcuterie board. My boards are simple, use common ingredients, and shouldn’t break the bank. It’s so easy to create a beautiful charcuterie board, and I’m going to share step-by-step instructions on how I put mine together, and what exactly we use.
What is a Charcuterie board?
The word charcuterie simply means cold, cooked meats. It is a French word for a branch of cooking that revolves around prepared meats, like sausage. While everyone’s definition of what makes a true Charcuterie board may vary, our boards are usually a mix of meats, cheeses, and some fruits and vegetables to fill in. We take a vegetable or fruit tray, a cheese board, and a charcuterie board and combine them into one epic charcuterie board full of delicious snacks. These boards are a great way to provide a variety of appetizers together.

Here’s what we include in a charcuterie board-
Crackers– Crackers are going to be your delivery system. While you can certainly just grab a piece of salami or a piece of cheese and chow down, it can be fun to make different creations with a cracker being the base. In this board, we used Ritz crackers, Pita crackers, whole grain club crackers, and bruschettini. You can certainly use any variety of crackers you like, and you don’t need too many options, you can safely use 2-3 to give everyone a variety to pick their favorite kind of cracker.
Meats– When we are picking a variety of meats for our board, we usually stick to a few different types of meat that everyone loves. We use salami- it is always a favorite, and we love making our favorite charcuterie roses, as well, to add a lot of visual interest to the board. We also love prosciutto. It is a thinner meat that is popular for these boards, and one my husband really enjoys. For our third meat on this board, we opted for a hot calabrese, to give a spicy option. Capicola is another great choice to go with prosciutto and salami, and we have also enjoyed summer sausage on boards before. If you need tips on how to present the meat, check out our tips on how to fold meat for a charcuterie board.
Fillers– We like to include fresh fruit and sometimes vegetables as fillers on our boards. The fruits are a good palate cleanser to give yourself a break from all of the strong meats and cheeses, so they are great filler snacks, as well as great for filling blank space on the board. We used grapes, strawberries, blueberries, some cherry tomatoes, and some gherkin pickles. We like to add pickles to any board we make. Another option to add interest to the board would be fresh herbs like rosemary, that you can add just for some extra decoration. Dried fruits are also another great filler option. One fruit we don’t recommend using is apple slices, while a popular choice, they brown quite quickly, and wouldn’t look as appetizing after a while on the board. You can even add some sweet ingredients. Candies, chocolate truffles, or chocolate covered nuts or fruit are all great ideas.
Cheeses– We try to include a variety of cheeses, from hard cheeses to soft cheeses so that everyone can pick their favorite, and there is cheese for snacking, as well as a spreadable cheese for the crackers. On this board we used cheddar, pepper jack, and goat cheese. We also included a wheel of brie cheese for a softer cheese, as well. The cheddar and pepper jack we made into slices as well as cubes. I like the cubes for filling empty space on the board. I like to use small bowls for any softer cheeses we use, just to keep the board from getting too messy. Also be sure and include cheese knives if you need them. If you don’t want anyone to have to touch any food on the board, some miniature tongs are also a great option to have.
Condiments– You’ll also want a couple of condiment options for your board. We don’t always include these if we are just making a board for ourselves, but they’re great to include for guests in case they want some extra flavor. We opted for one savory option- stone ground mustard, and one sweet option- strawberry jam. You can use any flavor of jam you prefer, there are so many great options like peach, apricot, grape, raspberry, fig jam, and more. The same goes for the mustard, use whatever variety you like.
What kind of board should I use for charcuterie?
You don’t need any special kind of board. We use a large board that we have had on hand, it is just a simple wood cutting board. Of course there are so many fun shaped boards to choose from today that you have plenty of options if you want to invest in a fun board for charcuterie. Whether you need a smaller board or a big board, we have found great boards at places like Home Goods, TJ Maxx, etc… for great prices. You can also find some great ones on Amazon!
We also like to use bowls for smaller items and sauces or condiments, so having a few simple smaller bowls on hand will be helpful.
How to Arrange a Charcuterie Board
When it comes time to assemble your board, I keep it super simple, and here’s my thought process that I go through while building the board.
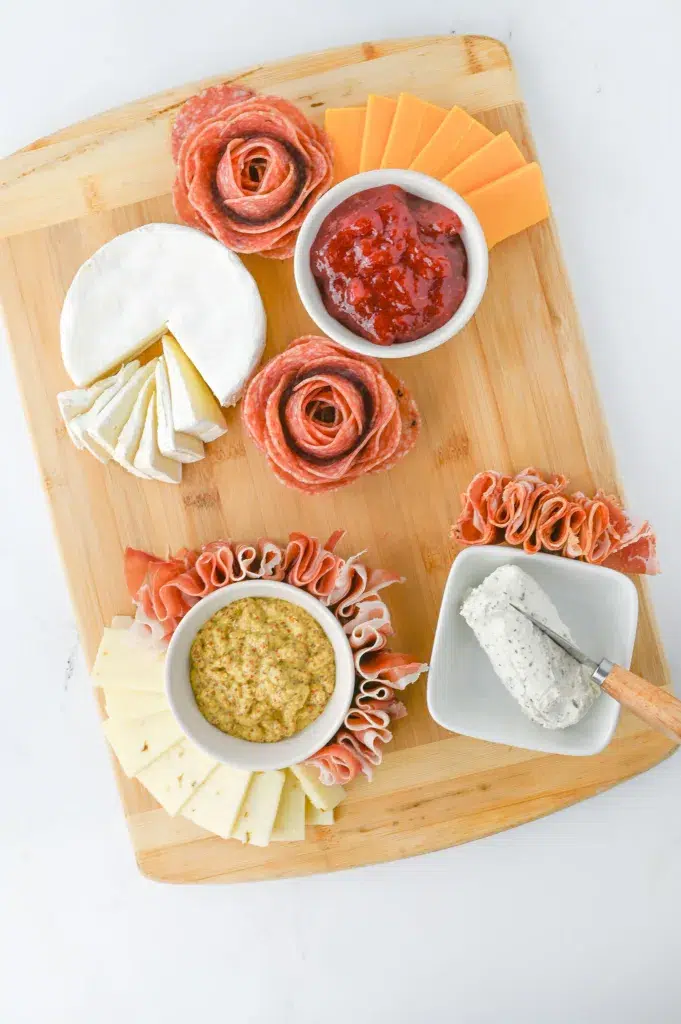
Step 1: Pick a few anchor points on the board. For me, these are usually any bowls I need to include, or any larger items, like our brie on this board.
Step 2: Start filling in around your anchor points. We moved forward with this board by stacking our cheese around the outside edges of our condiment bowls. Be sure to consider the height of your items. We added two layers of the cheeses so that they wouldn’t be buried when we added our other ingredients.
Step 3: Next, we got all of our meats folded- remember to check out how to fold meats for charcuterie boards, we made salami roses, prosciutto ribbons, and I made “salami” chains with the calabrese. The roses are pretty large, so I position those around, and I wrapped the other meats around our bowls.
Step 4: Next, I added our cracker varieties. You don’t have to add all of the crackers at once, see our tips below on refilling those. We just wrapped those around and filled in some space, and I actually used the ritz to prop up the outside edge of one of our salami roses. I love lots of curves on my charcuterie boards.

Step 5: Fill the rest in. For the rest of the board, we filled in blank spaces with our fruits and vegetables, plus some of those cheese cubes we made. Here you can assess if you need to add any extra layers of any ingredients to fill in the height of the board. We added a knife for the goat cheese, and a skewer fork for the pickles, or the fruit.
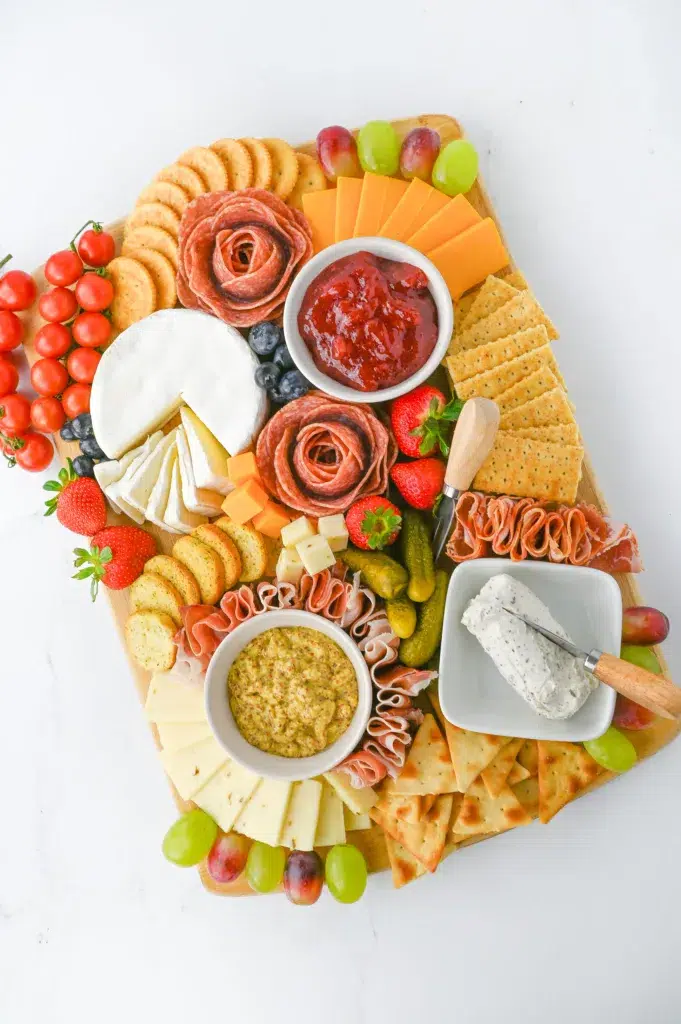
There you have it, a pretty darn cool looking charcuterie board!
Charcuterie Tips & Tricks:
- Don’t feel like you always need to make giant charcuterie boards, you can also just purchase enough to make a small charcuterie board for two.
- When determining how much food to purchase for your number of guests, consider adding about two ounces of meat and two ounces of cheese per person. The rest can just fill in really, just be sure to have enough crackers for each piece of meat and cheese available.
- You don’t have to add everything to your board at once. Things like crackers can easily be added as they are eaten and gone from the board.
- Remember, you can totally customize the ingredients on your board. You can use whichever cheese is your favorite cheese, or whatever favorite meats you enjoy.
Can I make a charcuterie board ahead of time?
You can! Obviously, we don’t want our meats and cheeses sitting out too long at room temperature, so if you need to prep your board a little ahead of time, you can assemble the whole thing, and then wrap the entire board in plastic wrap. Don’t wrap it so tightly that you smush everything, but it’s okay if you have to do a little adjusting when you go to unwrap it. If you are going to store it for more than a few hours in the refrigerator, I would remove the crackers, and put those into a plastic storage bag, so they don’t become stale, and just place those back just before serving.

Whether you have a big event, a special occasion, or a small gathering, you can easily put together a great board for your next party.
While we love a classic charcuterie board, be sure and check out these other fun “charcuterie” boards we have made-
A Patriotic Charcuterie Board for the 4th of July or Memorial Day.
A Taco Charcuterie Board– a super fun option for taco night!
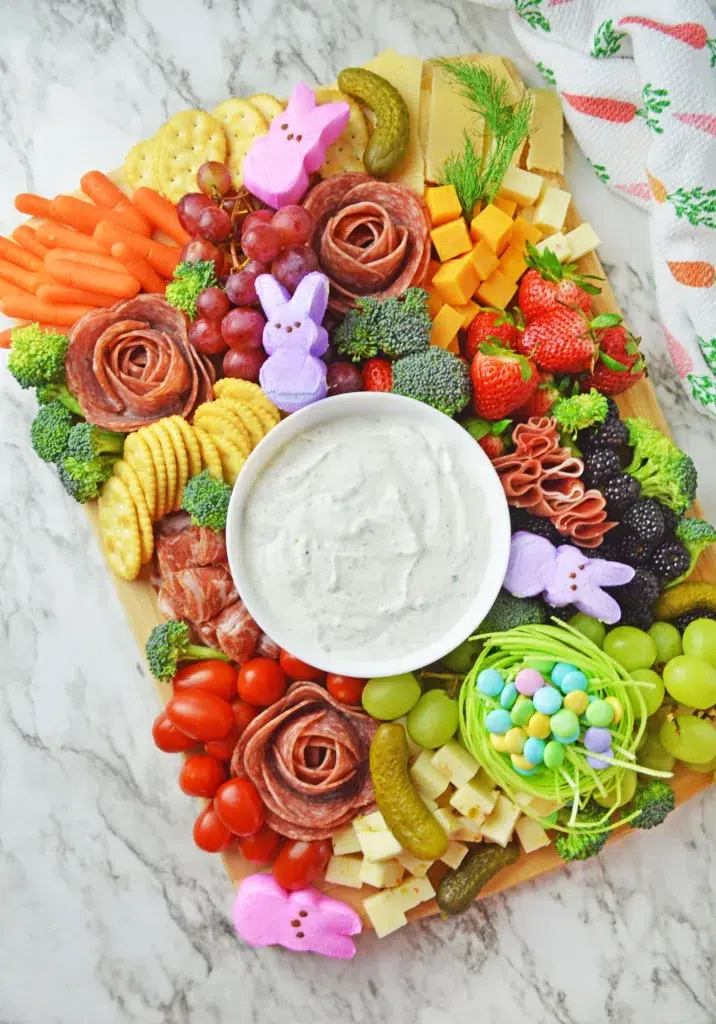
This easy Easter Charcuterie Board made with all of our favorite ingredients, plus yummy Easter candies.
Our Hot Chocolate Charcuterie Board is such a fun hot chocolate board idea, perfect for holiday parties.
Then, be sure to check out these fun Individual Charcuterie Cups, for another great way to serve charcuterie to your guests!
How to Make a Charcuterie Board

How to make a charcuterie board, using easy ingredients, that your guests will love.
Ingredients
- Meats
- Cheeses
- Crackers
- Fresh fruit and vegetables
- Condiments
Instructions
- Pick a few anchor points on the board. For me, these are usually any bowls I need to include, or any larger items, like our brie on this board.
- Start filling in around your anchor points. We moved forward with this board by stacking our cheese around the outside edges of our condiment bowls. Be sure to consider the height of your items. We added two layers of the cheeses so that they wouldn’t be buried when we added our other ingredients.
- Next, we got all of our meats folded- remember to check out how to fold meats for charcuterie boards, we made salami roses, prosciutto ribbons, and I made “salami” chains with the calabrese. The roses are pretty large, so I position those around, and I wrapped the other meats around our bowls.
- Next, I added our cracker varieties. You don’t have to add all of the crackers at once, see our tips below on refilling those. We just wrapped those around and filled in some space, and I actually used the ritz to prop up the outside edge of one of our salami roses. I love lots of curves on my charcuterie boards.
- Fill the rest in. For the rest of the board, we filled in blank spaces with our fruits and vegetables, plus some of those cheese cubes we made. Here you can assess if you need to add any extra layers of any ingredients to fill in the height of the board. We added a knife for the goat cheese, and a skewer fork for the pickles, or the fruit.
Nutrition Information:
Yield:
10Serving Size:
1Amount Per Serving: Calories: 412
Nutrition information isn’t always accurate.